User Tab
The Users page is only available to Administrators.
This page shows you all the enrolled users for your organization, including those registered via a class. Classes are groups of users who are assigned specific content, more on the classes tab here.
Users include learners (students), coaches and administrators.

There are three ways to enroll users to Bodyswaps:
- Individually
- Bulk - via CSV file import (learn more)
- Via a class self enrolment link (learn more)
Each user can be assigned one or more roles and also given a tag for quick search purposes.
Enrolling individual users
Click the Add User button at the top and put in their name and email address and optionally assign roles and a tag. You can also restrict content access at a user level. Once a user has been added, ensure you invite them to register for Bodyswaps Go by clicking on the mail icon next to their name. Invitations can also be sent in bulk - more on this is explained below.
Roles
Every user can be given one or more role(s) - the more roles they have, the more they can do in Bodyswaps:
- Learners (default) - can generate short codes to access the app.
- Coaches - can create classes, add users to classes, and view tracking data for learners in their class.
- Administrators - can create classes, manage users, devices and access.
Tag
If you have a lot of users, the tag field allows you to add a tag for each user so that you're able to search amongst your users from the search bar in the User tab and in Classes as well for easier management. You can add this when adding a user initially, or you can edit this on their user page at a later stage by clicking the pencil icon (right-hand side of their account in the user list).
Restricted Content
By default, learners can use any content that is enabled for your organization's account. However, if you'd like specific users to be restricted to specific content, you can do so using the drop down list here.
Note: There is a much more convenient way to do this via the classes function (learn more about the classes tab here).
Bulk user enrollment
You can import users via a CSV file by following the instructions linked here.
Alternatively, you can create a class and create a URL that links to a form where users can self-enroll themselves.
Registration and invites
It’s important to understand that we don’t force every learner to create a password on Bodyswaps Go.
With classes (learn more about the classes tab here), learners can generate six-digit codes via a unique URL that is emailed to them. This makes it quicker for them to get to the content and by-passes the need for a Learner Bodyswaps Go account.
However, admins and coaches do have to register and create a password. For these users the process is:
- Add them to the system using name/email
- Bodyswaps sends them an invitation email
- They click on the email and create a password
In the user list, you can see the status of the user’s registration:
The status can be:
- None - the user is enrolled, but has not registered.
- A single envelope icon is visible that you can click to trigger an invite message (not applicable for guest users).
- Invite sent - the user has been sent an invite but not responded yet.
- A multiple envelope icon is visible that you can click to resend the invite in case they lost it.
- Registered - the user has created a password and can access Bodyswaps Go.
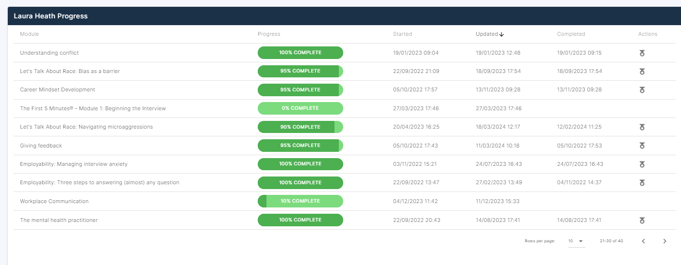
New: Tracking on an individual's user progress and completion
On a user's page you can see:
- All modules they've started,
- When they started the modules,
- When their progress was last updated on each,
- When the modules were completed,
- Their certificates.

Bulk invitation
Clicking on the envelope icon to send an invitation to lots of users would be time-consuming, so you can do this with a single click on the button SEND INVITATIONS. This will show the dialogue options as shown in the image below:
You can then click to send an invitation email to all your users, or just the ones that haven’t been invited yet.
Note: this feature is also available at the class level.
The invitation email
When the invitation email is sent it contains a unique link from which they can create a password to access Bodyswaps Go.
User limits
You may have a maximum number of users allocated to your account. If so you will not be able to upload or create new users once you have exceeded this allocation.