
The Classes feature in Bodyswaps allows administrators to create and manage classes, enroll learners, assign simulations, and track progress—all from one streamlined dashboard.
If you're looking to learn more, register for our Bodyswaps 3.0: Introduction to Pathways + Upgraded Classes Webinar on April 29th for a live walkthrough and chance to ask questions.
How to Create a Class for Bodyswaps 3.0
Creating a class is the first step to assigning simulations and tracking learner progress. Follow the steps below to set up a class within the Bodyswaps admin dashboard.
1. Navigate to the Classes Tab
Start by logging into your Bodyswaps admin dashboard. Then:
-
Go to the Classes BETA tab.
-
Click the Create Class button.
This will open the class setup form.

2. Fill Out Class Details
In the class setup form, you’ll need to enter the following information:
🏷️ Class Name
Give your class a clear and descriptive name to make it easy to identify.
👥 Admins & Coaches (Optional)
Assign users who should have admin or coaching access to this class:
-
-
-
Click the Additional Admins & Coaches dropdown.
-
Check the box next to each person you want to include.
-
-
These users will be able to manage the class, track learner progress, and access relevant reports.
📧 Support Email (Optional)
Enter a support email address. This will appear at the bottom of any automated emails sent to learners from this class. You can use your personal email, a shared inbox, or your university’s IT support address.
📬 Completion Notification Email (Optional)
Enter an email address to receive notifications whenever a learner completes the class. This is useful for tracking engagement or triggering next steps in your learning workflow.
3. Save Your Class
Once all details are entered, click the orange Save button to finalize your new class.
Dashboard Tab
The Classes Dashboard in Bodyswaps allows you to manage class access, enable self-enrollment, and monitor assignment progress—all in one place.
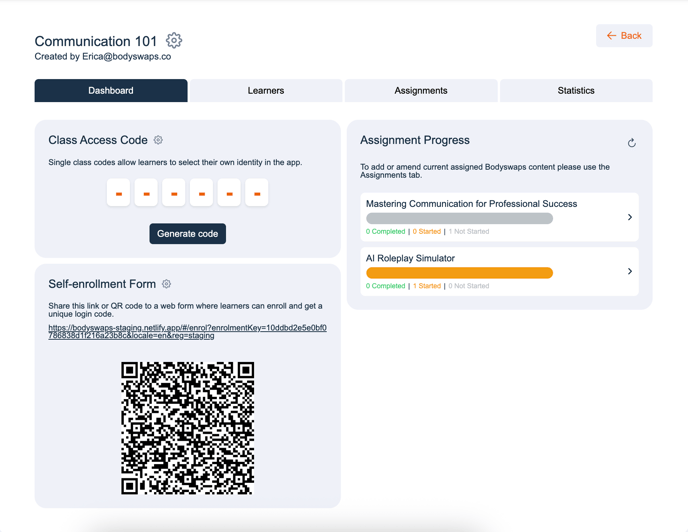
🔐 Class Access Code
To adjust how learners join your class click the cog icon next to Class Access Code.
From here, you can update key settings:
-
Allow learners to self-register: Let students enroll themselves using a custom form.
-
Allow guest access: Enable non-registered users to join the class.
To generate or reveal the class access code:
-
Click Generate Code under the Class Access Code section.
This code is what learners use to access the class in the Bodyswaps app. - This code is valid for 1 hour.
🔗 Self-enrolment Form
Under the Self-Enrolment Form section, you’ll find:
-
A shareable link to send to learners so they can register themselves.
-
A QR code for easy access—perfect for classroom presentations or printed materials.
Find more information about self-enrolment in our Enrolling Learners Help Centre article.
📊 Assignment Progress
View the Assignment Progress section to see a summary of all current assignments for your class. Here you can see how many learners have:
-
Not started
-
Started
-
Completed each assignment
🔍 View Detailed Assignment Data
To explore specific learner activity for an assignment:
-
Click the assignment name to open detailed progress and performance analytics.
This helps you quickly identify learners who may need extra support or reminders.
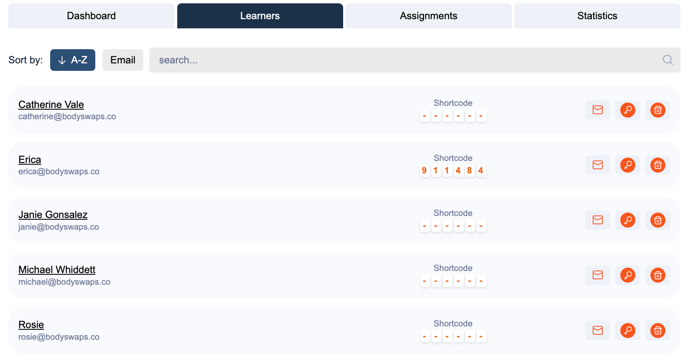
Learners Tab
The Learners tab provides tools to invite and enrol users, monitor individual engagement, and manage learner access with ease.
📩 Invite or Add Learners

At the top of the Learners tab, you'll find two key buttons:
-
“Send Invites” button – Use this to invite send all current learners in the class and invitation via email.
-
“Add Learners” button – Use this to add existing Bodyswaps users to your class.
🔔 Note: The Add Learners function only supports users who are already in your organization’s Bodyswaps account. To upload users in bulk, see our article:
👉 How to Bulk Upload UsersPlease see all enrollment options in our Enrolling Learners article
🔍 Search, Sort, and View Learners
Below the action buttons, you'll see a list of learners currently enrolled in your class.
You can:
-
Search for learners by name or email
-
Sort the list
Each learner entry includes:
-
Their name and email
-
Shortcode (if available)
-
Action icons (see below)
🔧 Use Action Icons for Individual Learners

Next to each learner’s name, you’ll find several icons:
-
✉️ Envelope – Sends a class invite via email to that learner.
- 🔍 Magnifying glass – Generates the learner's short code, this code is valid for 72 hours.
-
🗑️ Bin icon – Removes the learner from the class.
📱 View Learner Activity
Click on a learner’s name to view detailed information about their app usage.
Assignments Tab
The Assignments tab allows administrators to assign learning content—either full pathways or individual modules—to their class.

➕ Add a Pathway or Module
To get started:
-
Navigate to the Assignments tab within your class.
-
Click "Add a course or module..."
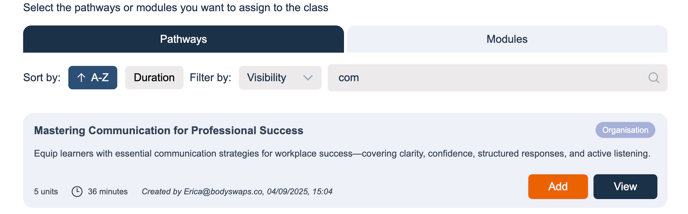
- Click the View button to see more details about the assignment.
- Click the Add button to assign it to your class.
Learn more about pathways in our Pathways Article